Saturday, January 16, 2010

Land of the Dead

Late last year I was asked by one of my animator Karen Webb to make her a rig for her thesis. At fist she told me that she just wanted standard stuff, a rig that can do things most rig do now days...IK,FK, parent switching, good skinning, decent deformation the usual. And because she wanted very very specific face controls she is even going to do the facial rigging herself. Piece of cake I thought...

Everything was great until she told me that...her character's arms has to be detachable...Oh!? Because it's a zombie girl she said..and this zombie is going to take her own arm off sometime in the middle of story and it would be nice if her rig can let her do that. Um a smooth skinned character with a detachable arm...now that's like my kind of challenge, the good thing was that she gave me the geo to make it happen. A full body geo for a normal rig, a geo with the body but no arm, and a arm with no body. Than 2 different skeleton was build, one for the normal full body, and one for the arm that's going to come off, which is on top of the normal full body. The system work kind of like parent switching but on a skinning level. It wasn't as bad as I thought.

So in the spirit of the new year and soon coming of 2012 which I hope is a end of the world. And if it's really the end, I hope it's a Zombie outbreak, because zombie overun isn't a bad way for humans to go...so here is the Zombie Grl Rig and ::SPOILERs for Karen's Thesis:: The zombie girl is the main character's girl friend before she was a zombie...weird....

Zombie Grl Rig from zhentingzhou on Vimeo.

Friday, December 4, 2009

Auto-Pilot

So here is two rigs that I done both with the function of auto-flying or auto-animation
because they are flying creature and bugs that does repetitive motion it is just easier to have such things build in the rig. And just in case your wondering...to make animators happy there is much offset controls and the auto-animation is always be turned off.

The first rig on display is the Mr.Bug rig done for the thesis known as "Luciernaga". Luciernaga is a creation of two of the most talented lighting/rendering/compositing artist that I have ever worked with. Matte painter extreme Jesse Flores and kick-ass compositor Jessenia Nauta. There was some "difficulty" in the making of this rig. The original model that was given to me was in 100 different pieces, literally. And the rig was expected to be skinned, after some back and forth the model was fixed and the rig was ready for animation. I can't wait to see their finished work. You can check out there progress at...

http://lecheproject.blogspot.com/


Bug_test from zhentingzhou on Vimeo.


As for my own thesis I have arrived at the point which is needed for me to start planning the animation of my butterflies. The key-frame animation part of my thesis is coming along and if noting goes wrong it could be done by the end of this year or early next year before the second semester starts. I wrote an auto-rigger for my butterflies because I need to rig about 25 different butterflies and doing all that work by hand...is not very fun. So here is my butterfly auto-rig


butterfly_autoRig from zhentingzhou on Vimeo.

Sunday, November 22, 2009

The first sine of madness!

One of the most useful trig function in 3D that's applied often in dynamics, rigging, or even modeling is the Sine function. It is a good clean way to get a rhythmic flow while at the same time easy to control for offset and do useful math for animation.

So I'm here to talk about 4 ways to create the sine function in Maya each with it's benefit and drawbacks.

1.Expression

This is by far the easiest way to create the sine function in Maya, it's clean, fast, and easy to read creation makes this, probably the most used way to make the sine function. But there is a debate about when and how an expression should be used.

People like Aaron Holly and Jason Schiffer had talked about sometimes it's better to make a node net work insisted of writing an expression because the nature of expression "could be" heavy at run time.

You see when an object’s attributes are accessed via a MEL script, Maya does not make connections for the relevant attributes of the nodes, so the directed graph evaluation process is bypassed. In order to ensure that the value of expression's target is consistently up to date, the Evaluation option must be set to Always so that the evaluation can be triggered when necessary.
So for the expression to work it needs to be evaluated every frame and can slow down the scene.

2. Set-Driven-Key

This is kind of a "hack" way to get the sine function to work in Maya, it is lite to use and won't slow down the scene but it does not give the absolute true value of the sine function just a very close one, This doesn't take too long to setup but could get messy.

The basic idea is we are going to create a simple version of the sine function by having an input value(a channel) that's in degrees, being the driver it will set-driven-keys anther channel from 0-360 which than will outputs values from 0,1,-1,and 0. Set that animation curve to cycle pre and post infinity you got yourself a simple sine curve.

3.Ramp

This is very much a "hack" way to get the sine function, this was shown to me by a very clever fellow by the name Alon Gibli who is an amazing rigger and technical artist.

So what this is trying to do is to create the closest sine function without using an expressions. First make a multiply-divide node with the degrees being the input -input 1 (x) divide that by 360 so the degree value is normalized to the ramp value of 0-1. Connect the output 1 (x) to v-cord of the ramp. Set the ramp to a 0,1,-1,0. The output color of the ramp should be the function. Of course I was made aware that this could cause bugs to come up in Maya. But it is a pretty useful way to create the sine function

4.Trig model

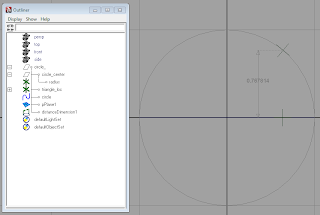
This is by all means the least practical way to create the sine function, it takes a long time and has a very unnecessary "involved" way to setup. But it is a somewhat correct way to find the sine function that is unique enough for me to show it.

This method tries to create the a triangle in side a Maya circle but first you will need.
a circle radius of 1
a plane that sits horizontal in the middle of the circle
and two locators

The circle of course has a radius of 1 will be the hypotenuse, a locator is snapped on the the circle (name it locator 1) and will be grouped to a null object with it's the origin at the center of the circle. Rotating that null-group will move locator 1 in a circular motion creating the opposite.

Create another locator (name it locator 2) that's point constrain to the first loactor but at the same time geo-constrain to the plane creating adjacent side. "Note this only works because Maya treats geo-constrain differently than a normal, parent, point, etc constrain."

Finally Make a distance node that's between locator 1, and locator 2. So whenever the null-group is rotated in degrees the distance-node will give out the sine-function.

Of course these are not all of the ways to create the sine function in Maya, plug-ins such as (Mathematic Nodes) are very helpful. But if you have a good way to create the sine function please share.


Monday, November 16, 2009

Bacon on legs

small update with the pig rig.
When I did this rig I was thinking...
well this is the only time I'm going to make a pig rig with these specs that the animator wanted
so there is no point in scripting anything...or write down what I did, I'm never going do anything else like this ever again...(and finished the rig)

about a month later Tyler tells me that there are going to be major changes because he needs new blend-shapes and corrective shapes and more controls, etc
but because the original blendshapes where setup in a messy way the rig needs to go back many many version before the current one...which is version 1.7.0

so I opened up version 1.4.0 the last use-able rig and looked at the screen...I froze in amazement of my own stupidity. I forgot how I did the pig rig...by taking apart my own rigs, I piece together the setup I did before
In the end cause the rig isn't all that complex so it worked, but that's one more weekend wasted because of epic fail on my part...

I learned my lesson...ugh...like my grandfather use to say...
"crappy notes are often better than good memory"

PiG_Rig from zhentingzhou on Vimeo.

Saturday, October 31, 2009

The Personification of Death...

In the spirit of Halloween I'm posting the Grim Reaper Rig that I done for Tyler Heckman
He is currently animating his thesis with this rig, along with the W.I.P pig rig...which I have to patch-up pretty soon...

One of the main challenge of this rig is getting the robe to work with out using n-cloth, giving enough control with out over killing the rig with one million+ controllers
The solution that I used is Ribben spines under hierarchys so there can be soft deformations
And this rig is also pretty strenchy happy...with some on face controls

This Rigging demo shows some quick test of the rig, and it has a walk cycle and a short animation by Michelle Czajkowski, thanks to her this rig actually looks pretty good

You can find Tyler's stuff Here
And Michelle's stuff Here

GrimReaper.Rig from zhentingzhou on Vimeo.

Friday, October 23, 2009

Please...Bear with me

This rig was done for my animator friend Jerry Chow and his thesis...
A boy in a bear suit and his adventure of hunting for honey.

For this rig, I was promised animation help from him on my thesis.
Check out his work Here

Ronald bear Rig from zhentingzhou on Vimeo.

Wednesday, October 21, 2009

Work in progress


so I finished rigging my dancer character for my thesis.
Animation is finally starting
I'm still working on a few rigs for some other people...but all those are done or almost done
This will be my last RIG...done manually.
I'm planning to write my own auto-rigger

It won't be too bad, because I already use script to build parts of my rig
such as arm skeleton, fk-controllers, and ik-spine.
It won't be some advance code. Just simple logic "build scripts" that works together.
The end goal is to save time on repetitive task.
Hopefully I can get it in some use-able stage by early next year
Until than I can finally focus on my thesis project